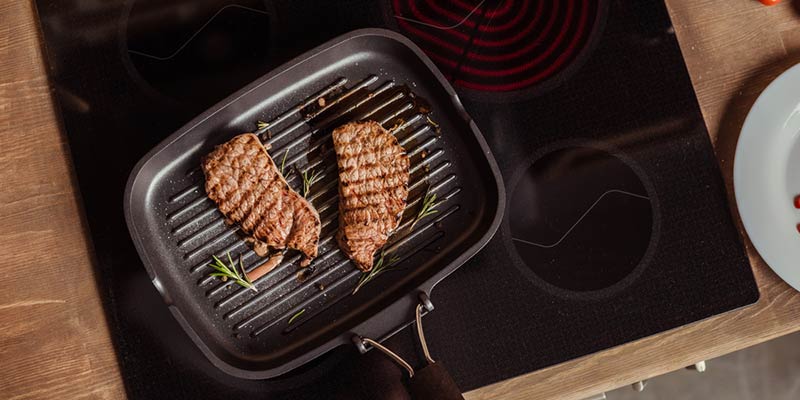
When it’s about cooking, having the right kitchen equipment is crucial. To make the best, juiciest and sumptuous steak, a grill pan is a great choice, no doubt.
But things are okay until you need to grill but there’s a lack of time and room to get it going. However, at such a moment, you can use a stove to grill your food.
So, that being said, how to use a grill pan on a stovetop? What are the advantages of using a grill pan? Or, what foods should you cook with a grill pan?
Get a cup of coffee and read on to the last, you’ll get all of your answers.
How a Grill Pan Works
 A grill pan is almost similar to a frying pan but comes with a unique design (raised edges) that makes our cooking easier.
The way it works is- when you heat up, say, a chicken breast on your grill pan, the surface that is directly in touch with the metal absorbs a huge amount of heat.
And, this high level of heat creates those iconic char marks.
You can use the grill pan easily on both gas-powered and electric stovetops.
Things You’ll Need
Before you start working through the steps of using a grill pan on a stovetop, let’s get to know about the things you’ll need.
- Grill pan
- Tongs
- Paper towel
- Scrub brush/aluminum foil
Best Cast Iron Grill Pan in a Video Review
6 Steps to Use a Grill Pan on Stove Top
Now, entering into the core of our discussion. Once you’re done with managing the things you’ll need, go through these steps below.
Step 1: Set a Grill Pan on The Stove

First of all, take your grill pan and place it on the burner.
If you use a large grill pan that needs more than one burner, you can place the grill pan across the same-sized two burners, no problem. It helps to distribute heat evenly.
One more important thing is to prepare the sustenance.
To make sure the cooking is even, you need to cut the bits of sustenance (you are going to grill) into half-inches thickness.
This will make sure that any part is not overcooked as well as the inside is ideally done.
Step 2: Preheat the Grill Pan for 5 Minutes
Now, it’s time to warm the grill pan. Turn the burner on medium-high heat. Before you put the food in your grill pan, leave it alone for at least 5 minutes. This process is for making sure that the pan’s entire surface is hot.
However, it may take up to 5 minutes sometimes depending on the kind of stove you use. But do not skip this step because it is important to ensure that your food will not be overcooked in some spots.
Do not spot your fingers straightforwardly over the grill pan to test if the pan is ready to use. Rather than, flick some droplets of water on the grill pan. If the water sizzles and evaporates fast, then you can use the pan right now.
Step 3: Wipe Your Grill Pan with Oil
 Wiping the pan with oil will help it to prevent your food from sticking. But never coat the pan with oil. Otherwise, it may make your pan smoke at a high temperature.
The right way is to turn a paper towel into a loose ball first. Then grab the ball of paper towel with a pair of tongs. After that, dip that piece of paper towel into a little vegetable oil.
Lastly, wipe the surface of your preheated grill pan with that paper towel.
Step 4: Brush Your Food with a Little Oil

Before you brush the food with oil, you better pat the food dry. This will create the best possible sear on the grill.
Once you’re done, sprinkle pepper and salt according to your food habit. In case, you marinated the food, try not to use garlic or herbs that might burn in your grill pan.
Step 5: Start Cooking
The last thing you are going to do is, place the food you need to cook into your preheated grill pan.
Now, let it for grilling until it’s half done. After that, flip the food using tongs and leave it to be grilled again until it’s fully cooked. Do not forget to follow safety precautions while cooking (e.g wear gloves while touching hot stuff).
Pro tips: If you place several things in a grill pan (e.g sausages), try to leave a half-inch space between them. And, if you need to melt cheese on a hamburger, put down the cheese on the patties first. Then, keep an overturned bowl over your food. It will work like a lid that allows the cheese melt.
Step 6: Clean Your Grill Pan

This is in step 6 because it’s an unavoidable part of using a grill pan. Never put it off for another day hoping you clean it after. Because it needs proper maintenance to last long.
So, wait until the pan is cold enough so that you can handle it well. Then, scrub your pan with a grill brush under hot water. Continue scrubbing until there’s no oily areas or burned bit is left.
After that, rinse the pan well and use a kitchen towel to dry it properly. You can use an aluminum foil piece to scrub the grill pan in case you do not have any scrubber.
What to Cook with a Grill Pan?
Ask me what you cannot cook with a grill pan! Because there are endless options to cook with a grill pan from veggies to meats. Such as…
- White Meat: You can make delicious grilled chicken, pork, and turkey.
- Red Meat: Grill pan is an amazing option to make juicy steak and burger.
- Seafood: Salmon, scallops, shrimp, and whatnot! Grill pan is a perfect choice to cook seafood.
- Vegetables: You’ll find vegetables even tastier once you grilled them. Try Brussels sprout or Eggplant today!
- Sandwiches: You will love the grill pan once you make grilled cheese or panini with it.
Why Should You Use a Grill Pan?
Most of the people are okay with using a frying pan and they do not think much about getting a grill pan. But some things let them choose a grill pan.
You can Grill Even More Food at a Time
It will save your time as a grill pan is larger, it can contain more food in one go So, you may cook any type of vegetables along with meats at the same time that will save your time as well.
You will Get Healthy Cooking
A grill pan is easy to use and offers you to cook a healthy meal. Moreover, it maintains the proper flavor of your food.
The ridges you will find in your grill pan helps the juice and fat from the meat to drop off. It will prevent your food from grilling in its juices. For this, you can collect the juice and use it for sauces.
The Grill Marks
People love the steaks having solid grill marks more than normal steaks. The meat will get a nice grilled look as well as crusty, dark dents that are pleasing enough. Moreover, grill pans cause a smoky flavor that you’ll love.
Additional Tips
- Try not to use nonstick grill pans since you’re going to heat the pan to a high level of heat. Because nonstick grill pans can not hold up against high heat.
- If you notice the food starts to smoke on your grill pan, open a kitchen window, or switch on the fan above your stove.
Conclusion
Voila! You now know everything about how to use a grill pan on the stovetop. It’s pretty easy to use and maintain a grill pan. Just ensure you follow the proper instructions and clean your pan regularly. Happy grilling!
- 10 Best Cast Iron Grill Pan for Healthy Steaks You’ll Like To Taste!
- 10 Best Stovetop Griddle For Delicious And Crispy Homemade Food
- How To Use A Griddle On A Gas Stove