How To Sharpen Fabric Scissors

Sharpen Fabric Scissors
I mean, who wants to work with dull scissors? But it’s normal that with consistent use, scissors will lose their sharpness and become dull. However, if you know how to sharpen fabric scissors properly, things will become easy to do for you.
And, if you don’t know how to get the job done, we are here to crack the nut for you. After looking over the whole article, you will find it easy to sharpen your scissors. Honestly, it’s quite easy to make it happen.
So, let’s dive in right now!
How to Sharpen Fabric Scissors- 5 Simple Methods
So, that being said, how to sharpen fabric scissors? Well, let’s see how you can do the job perfectly!
Using Sandpaper
The very first method is about using sandpaper, here are the details.
Step 1: Get a Piece of Sandpaper
First thing first, go and obtain a sandpaper of 150-200 grit. This grit will work just fine, however, if you want a smoother finish to the blades of your scissor, you can pick a bigger grit number.
Find the rough sides of your sandpaper that faces outward and fold the paper in half. Making sure that the rough sides stay forward will let your sandpaper graze against the blades while you cut the paper.
Step 2: Use the Scissor for Cutting the Sandpaper
Now, you should cut through the sandpaper using the scissor you are willing to sharpen. Once you cut 10-20 times to the long strips with your scissor, you will feel the blades becoming sharper.

And, you need to use the full strokes of your scissor- start cutting from the base and stop to the tip of the scissor. Scissors that are not terribly dull will become sharp enough by cutting through sandpaper.
However, if you don’t want to use sandpaper here, use a steel wool or emery cloth that works the same as sandpaper.
Step 3: Clean the Scissors
Finally, just wipe down your scissors, the blades of your scissors basically. For doing so, dampen a paper towel at first. Then, wipe down the blades using that damp paper towel and make sure you clean off any remaining sandpaper bit from the blades.
Using Aluminum Foil
You can sharpen your scissors using aluminum foil as well.
Step 1: Grab a Piece of Aluminum Foil
Well, that’s almost the same process as the previous method. Firstly, obtain an 8-10 inches long piece of aluminum foil. After that, keep folding the aluminum foil to make a minimum of six layers.
Make sure you fold the foil lengthwise. Once you find a thick foil having 6 or more layers, these are going to sharpen the blades of your scissor while you cut through the foil.
Step 2: Cut Through the Aluminum Foil
So, just like the previous method, start cutting the aluminum foil using the scissor you need to sharpen. Keep cutting the foil’s strips with the scissor until you are done cutting the whole of your thick aluminum strip.

Hence, you will want the full strokes of the scissor- start cutting from the base and stop at the tip of your scissor. If you cut skinny strips of the foil, this will sharpen the blades of your scissors a lot whereas if you need to sharpen only a bit, cut the thicker strips of the foil, it depends on how much sharpness you want from the blades.
Step 3: Clean the Scissor
Now, it’s time to get rid of the remaining aluminum bits on the blades. To make it happen, dampen a paper towel using warm water and then wipe both the blades with that paper towel.
It will make sure that there’s no aluminum residue on the blades.
Using a Sharpening Stone
Heard about a sharpening stone before? Yes or no, see the details below, you will get what you need.
Step 1: Get a Sharpening Stone
You can find a sharpening stone from a local hardware store around you. Once you have a sharpening stone, you will find two sides of it to sharpen blades- one is a coarser side and the other is a fine side.
In case, you are about to sharpen a terribly dull scissor, you should find the coarse side of the stone and begin with this side. At the last stage, finish sharpening your scissor with the fine side.
And, if you are dealing with a scissor that needs only a light sharpening, using only the fins side of your sharpening stone is okay.
Step 2: Lubricate the Sharpening Stone
It’s a part of preparatory work. Firstly, take a towel and put it under the stone. Then, use either honing oil or simply water to lubricate it.
Step 3: Detach Your Scissor’s Parts
So, in this step, you need to separate the parts of your scissor. Simply start with removing the screw that attaches the blades of your scissor together. This job is only for making sure that you can sharpen every blade separately.
To remove the crew, use a screwdriver that fits in the head of the screw well.
Step 4: Sharpen the Inner Side of Your Blade
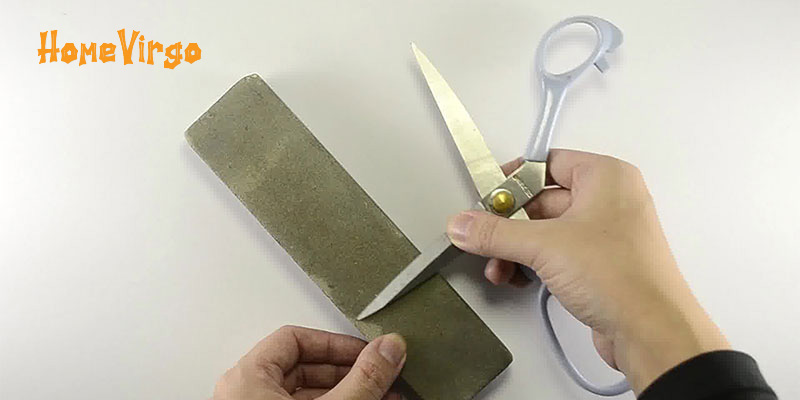
Grab one of the two blades and place it on the stone, make sure you have taken the inner part of the blade getting in touch with the stone you are using to sharpen. It’s not hard to create a sharp, nice angle between the cutting edge and the inner blade.

Mark the point where two edges meet, that’s the point where you will sharp the scissor. Hold the scissor blade’s handle and gently pull the blade to the stone. Keep the blade’s edge flat against your sharpening stone.
Do this job again carefully and slowly until you see the blade’s been sharpened. Only 10 to 20 pulls should be enough to get the job done. And, repeat it with the other blade of your scissor.
Step 5: Sharpen The Cutting Edge
Now, it’s time to deal with the cutting edge of the blades. Grab your scissor blade’s handle and lean that blade to you until you have the cutting edge lying flat on your stone.
Make sure the beveled edge is flat against the sharpening stone while you pull your blade across the stone.
Using A Glass Mason Jar
Here’s another typical way to sharpen scissors.
Step 1: Position the Scissor Blades Around A Mason Jar
First of all, take a mason jar and the scissor you want to sharpen. Open the scissor’s pair widely, as wide as they go actually, then fit the blades around two sides of your mason jar.
Make sure that you place the blades in a way so the mason jar can be as far as it goes between both of the blades. Hold your jar using one hand, and use another hand to hold the scissor.
Step 2: Cut Your Mason Jar
So, now you are going to cut the jar. To do so, squeeze the blades of your scissor closed as well as slide out the jar between the blades while you close the scissor. Well, it’s a similar way your scissor should be closed when you cut fabric or paper. And, remember to put a light pressure for closing the scissors, the glass will be doing the sharpening task for you.
Keep repeating the process and stop when you see the blades having a clean and smooth edge. Another point worth mentioning here, you should grab a mason jar that you don’t mind having scratch marks because there’s a good chance of happening this.
Step 3: Clean The Scissors
Here the same way to follow- take a paper towel, dampen it, and clean the blades of your scissor making sure that there are no remaining microscopic glass pieces on the blades.
Using Only a Pin
Yes, all you need is a piece of a pin!
Step 1: Grab A Sewing Pin
So, here’s another almost-same process as using the mason jar method. You can even use a smaller tool to get the job done. So, first thing first, take a piece of sewing pin and move on to the second step.
Step 2: Cut The Pin with Your Scissor
Now, carefully squeeze your scissor closed. Then, slide out the pin between your blades while the scissor closes. And, it’s the similar way that you follow for cutting a fabric or a paper. Make sure you don’t put too much pressure on closing the scissor, that metal pin will work well to get the sharpening job done for you.
Continue doing so until you see the blades to have a clean and smooth edge.
Step 4: Clean Up Your Scissor
The last step is always to wipe down your scissor. Like the other methods, you need to damp a paper towel here as well. And, use the towel to get rid of any remaining metal bits on the blades.
Additional Tips to Care for Your Fabric Scissors
Sharpening your scissors is not the only thing you should do with your scissor, there are a few tips that you should follow.
- Moisture brings nothing good for scissors. You should not leave the scissors on the ironing board after using them. It’s better to utterly dry the scissors before you start cutting with them.
- Use your fabric scissors to cut nothing but fabric. It’s best if you use another pair of scissors to cut the wired ribbon, fusible interfacing, patterns, and other things that can do bad to your scissors.
- If you expect to get the best cut, make sure the scissors are tight enough. You can use a screwdriver to tighten the pivot screw of your scissors.
- Make sure you sharpen the scissors regularly.
- There are several man-made fabrics that may damage your scissor’s metal. So, it’s important to wipe the scissors with a clean cloth after each use.
- Keep the case of your scissors closed. Make sure you put them away in a dry, cool place.
- When you cut the fabrics, do the job carefully and cut only at the right spot.
- Oiling the joint of the blades every few months is a good idea because it lets the blades work without friction. Apply the oil using a soft cloth and wipe it onto the screw area of your scissors. Also, make sure you remove the excess oil before you use the scissors.
If you follow the tips to maintain your scissors, you can make the most use of them!
Frequently Asked Questions
Conclusion
So, we are done sharpening our fabric scissors. Do you have any questions in your mind about how to sharpen fabric scissors? Hopefully, you do not have since we tried not to leave any confusion regarding the topic.
However, make sure you follow the steps just as we explained. And, take good care of your scissors. Fabric scissors are only for sewing whereas paper scissors are only for crafting and wrappings. So, yes, be careful and keep them clean, sharp, and efficient.


